Learning to read sheet music for beginners
Musical pieces are written in a musical notation on a music sheet. This notation is expressive enough to capture the essential aspects of the music in writing. But what does that mean exactly? A classical musical piece usually consists not only of a melody but also of an interlude or other musical sections that structure and vary the piece. In addition to the main melody, harmonic accompaniment, rhythm, dynamics, and tempo can shape the piece and create a rich and complex sonic landscape.
A piano with, for example, 88 keys can produce 88 different tones if each key is played individually. But how do you describe which of the many keys should be pressed? A pragmatic approach would be, for example, “Play the 56th and 57th keys from the left, followed by the 60th key.” Unfortunately, this method is not very effective - there are pianos with only 61 keys or even fewer, where the numbering would be different. And what if you want to play the piece on a guitar, which simply doesn’t have keys? Therefore, the following music notation has become established for Western modern music.
Introduction to Scales
Let’s start very simply - there are 12 different keys which describe the tonal “home base” of a piece, and the simplest one is called C major. It is the simplest because it is played only with the white keys on the piano. C major has the following scale: C, D, E, F, G, A, B, and the tonic is C - hence the name C major. So, what do these letters mean? Well, they are note names :) It’s best illustrated on the piano:

Play the keys shown above on your piano!
We will learn about other keys later, but first, we need to work on some basics.
Middle C - C4
Each white key is essentially assigned a note name. And as you can see, the note names repeat. So, that’s already a relief - instead of remembering 88 different names for the piano keys, we only need to remember seven note names for the keys. One of the keys also has a special significance - middle C is essentially the C that is in the middle of the keyboard - depicted in red in the following image.

Often, middle C is also called C4. The next C to the left of C4 is called C3, the next C to the left of C3 is called C2, and so on, down to C0. Similarly, this works with the Cs to the right of C4: the next C to the right of C4 is called C5 and then comes C6, and so forth. This number helps us describe which of the many Cs we mean.
Just to make it clear again, we always start with middle C (C4) and increase or decrease the number by one depending on the direction. This naming convention works for keyboards with fewer keys; all these keyboards can play a C4 (middle C), but depending on the number of keys, some pianos, for example, can only play everything between C3 and C5 - they simply lack the keys to play lower tones like C2 and C1, or higher tones like C6 and C7.
Of course, C is not the only note that can be precisely designated with a number (although there is only one middle C - there is no middle D or E, etc.).
Here is the same image as above, but with the numbers (octaves) added.

Or a keyboard with 61 keys

That sounds good! Let’s next see how we can write the C major scale on a music sheet.
The musical staff
Just like when writing words, we need some lines to orient ourselves. A so-called musical staff consists of five parallel horizontal lines and four spaces in between.
However, five lines are not enough to represent any note or key on a piano - 88 notes/keys simply do not fit into these five lines. Since we only have two hands when playing the piano and your thumb and pinky can only play keys close to each other simultaneously, two such staves are sufficient to represent everything playable on the piano: One staff for the notes played with the left hand and another one above it for the notes of the right hand.
Now let’s try to represent the notes of the aforementioned C major scale. From the above explanation, we know that this scale is played on the piano using the white keys and starts with the note C. Do we know more? Yes - the scale on the piano has no gaps - the next white key is always played.

In the above image, we see three attempts to represent such a scale. The black circular shapes are called note heads, and their position should ideally determine the exact note, but more on that shortly. Which of these sequences (A, B, or C) is correct? To give you a heads up, neither A, B, nor C is correct! However, all three attempts have one thing in common: they show a sequence of notes without gaps. If we ignore the black keys on the piano for now, this makes sense: there’s simply no space between two adjacent notes in A, B, or C where we could insert another note (all the lines or spaces are already occupied).
Does this help us to represent the C major scale? No - we still need a way to precisely determine the starting note (tonic), namely C. But that wouldn’t be enough either, as a piano has multiple keys for C (C3 or C4, etc.). We also need to be able to describe which of the many Cs we mean. Of course, we could now say that the scale is, for example: C4, D4, E4, F4, G4, A4, B4, C5. Now we know exactly which specific notes we mean and where to find the corresponding keys on the piano. That’s pretty good already, but this is not typically how it’s done, as we still need more information such as the duration of the notes, and this method quickly becomes unwiel
Clefs
As we’ve seen above, one staff with its five lines is not enough to clearly represent, for example, the C major scale. We need some kind of reference to determine which notes these five lines represent. Specifically, we need such a reference for one line, and the other lines can then be easily derived, as we’ll see shortly. This reference is called a clef, and to simplify matters, there are actually only two clefs for the piano that uniquely determine two notes or keys on the piano.
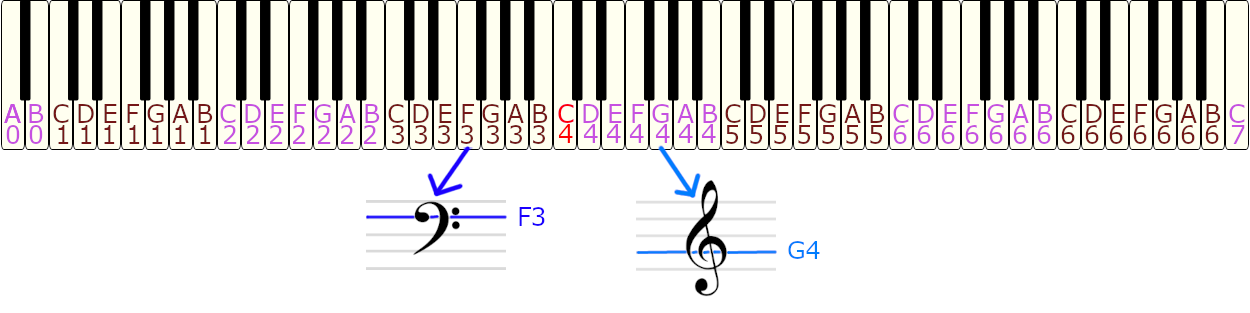
In the above image, we see two such clefs - the left clef is positioned below middle C (C4) - the so-called bass clef (F clef), and the right one is positioned above middle C, the so-called treble clef (G clef). The bass clef assigns the note F3 to the second line from the top (the line between the two dots), and the treble clef assigns the note G4 to the second line from the bottom (the line enclosed by the inner circle).
Now we have almost everything we need to uniquely describe the C major scale and assign it to the keys on a piano.
For example, our specific scale C4, D4, E4, F4, G4, A4, B4, C5:

If we want to play the scale a bit lower, for example, C3, D3, E3, F3, G3, A3, B3, C4, then it would be:

With the clefs, we can find any note on the piano by simply counting the spaces and lines and selecting the corresponding number of keys to the left or right of the reference note, depending on whether the note is above or below the reference note. Please count the lines and spaces and match them with the keys on the piano to find, for example, a B4, a C5, or a D4 (also an E3 and other lower tones).
For example, the depicted note D4 is located below the reference note of the treble clef - G4. Now, we count the number of lines and spaces, starting with the reference note G4: Counter=1, there is a space below it: Counter=2, then a line: Counter=3, and below that is the target note D4 in a space: Counter=4. So, our counter is 4. On the piano, we find the G4 from the treble clef and start counting from that key. Counter=1 - because the target note is below G4, we need to go to the left, step by step, while always counting. The key at counter 4 is our target note.
And now we are almost ready to read the notes of a simple melody.

Have you ever tried playing this note, and do you recognize the melody? It’s the famous lullaby: “Twinkle, Twinkle, Little Star.”
Octave Signs
Sometimes we want to use the full range of the piano and play very high or very low notes. Of course, we can already write such notes by using the appropriate number of ledger lines:

In the above-illustrated staff, we have some very low notes (D1, F1, A1, B1) and some very high notes (E6, G6, B6, C7). As you would probably agree, readability is not as straightforward as in the following image, which represents exactly the same notes to be played:

Did you notice the two dashed lines with the eights? The end of the dashed line points in the direction (upward or downward) to which this symbol refers.
A “8” sign placed upwards with the dashed line (ottava bassa) indicates to the player that notes above the dashed line should be played one octave lower (D2, F2, A2, B2). This means that although D2, F2, A2, B2 are written there, we should play these notes one octave lower: D1, F1, A1, B1. This applies to all notes of the staff above the dashed line, not to the other staff and not to the notes to the left or right of the dashed line!
Similarly: A “8” sign placed downwards with the dashed line (ottava alta) indicates to the player that notes below the dashed line should be played one octave higher (C5, E5, G5, B5, C6). This means that although C5, E5, G5, B5, C6 are written there, we should play these notes one octave higher: C6, E6, G6, B6, C7. This applies to all notes of the staff below the dashed line, not to the other staff and not to the notes to the left or right of the dashed line!
Notes, Note Values, and Rests
Now that we can almost read every note and find the corresponding key on the piano, we can soon start playing simple songs. We still need one important piece of information about the notes. We need to know how long we have to play these notes. In the case of the piano, this means how long we have to hold down the keys. Similarly, we also need to know when not to play and for how long - so we need to represent rests.
The duration of the note or rest is indicated by the note value. The following table lists all notes and rests with their names and corresponding note values:
| Note | Name | Note Value | Rest | Name |
|---|---|---|---|---|
 | whole note | 1 |  | whole rest |
 | half note | 1/2 |  | half rest |
 | fourth note | 1/4 |  | fourth rest |
 | eighth note | 1/8 |  | eighth rest |
 | sixteenth note | 1/16 |  | sixteenth rest |
As we can see from the note value, a half note has half the note value of a whole note and is played only half as long. Let’s assume we count evenly from one to four: 1, 2, 3, 4, 1, 2, 3, 4, 1, … and we play a whole note at 1 and keep the key pressed while counting 2, 3, 4, and just before the next 1, we release the key. A half note would then only be played from 1 to just before 3. So, half as long:
Whole note: 1, 2, 3, 4
Half note: 1, 2
And a fourth note has half the note value of a half note.
Whole note: 1, 2, 3, 4
Half note: 1, 2
fourth note: 1
An eighth note has half the note value of a half note. Since we already counted up to 1 in the previous example with the fourth note, we need a new counting method that allows us to halve 1. We do this by inserting “and” between the numbers:
Whole note: 1 and 2 and 3 and 4 and
Half note: 1 and 2 and
Fourt note: 1 and
Eighth note: 1
This means we play the fourth note: at “1 and” and release the key just before 2. We play the eighth note only at 1 and release it just before the first “and.”
This becomes much clearer when we introduce so-called measures, which allow us to count the rhythm out loud: A measure is essentially a grouping of the individual notes. In our counting example, each repetition from 1 to 4 would be a measure:
1, 2, 3, 4, 1, 2, 3, 4
----------  ----------
Measure 1   Measure 2
In this example, each measure has four fourth notes. So 4 * 1/4 = 4/4. This measure is called a 4/4 measure. You can also say, that the time signature of that measure is 4/4. The bottom number essentially represents the note value of the so-called beat -> fourth notes in our example. The top number indicates the number of beats per measure.
Here are some time signatures for our measures:
4/4 Per measure, we want to play four fourth notes, and we count: 1, 2, 3, 4
2/4 Per measure, we want to play two fourth notes, and we count: 1, 2
3/4 Per measure, we want to play three fourth notes, and we count: 1, 2, 3
6/8 Per measure, we want to play six eighth notes, and we count: 1, 2, 3, 4, 5, 6
The bold numbers represent the counting units that are slightly emphasized (played louder) in this measure. Therefore, different time signatures give the music piece different rhythmic characteristics - for example, a waltz is usually written in 3/4 time signature (1 2 3 1 2 3 …).
Just to clarify: there is no 2/9 time signature or 5/5 or anything like 4/1 - ultimately, the bottom number must be 2, 4, 8, 16, or 32, or 64.
And where do we find the measures for a piece of music?

In the above image, the vertical lines in the staff represent the grouping of the notes - that is, a single measure. The type of time signature is indicated by the time signature symbol, usually only at the beginning of the piece.
There are two special time signature indications, which are actually just abbreviations for time signatures we already know:
| Symbol | Takt |
|---|---|
 | 4/4 time |
 | 2/4 time |
Repeats
Many pieces of music consist of smaller sections that are usually played twice. Of course, you could simply write out the section to be repeated again, but it would be easier to just mark it accordingly:

In the above example, the measures numbered 1-5 have been marked. A repeat sign takes the form of a final barline with two dots on the side indicating the direction in which the one-time repetition of one or more measures is required. At the beginning of a piece of music, no repeat sign is notated; therefore, the repetition occurs when there is no left (opening) repeat sign from the beginning.
This means the following measures are played: 1 2, now we repeat: 1 2, now we move to the next section to be repeated and play 3 4, repeating: 3 4, and now the final measure: 5.
Often, the endings of repeats are played slightly differently to, for example, create a more exciting transition to the next section:

In the above example, we have two alternative repetitions, and we play the following notes: G G A A first alternative ending C C, repetition: G G A A second alternative ending E E.
Soon we’ll have learned everything we need for our first pieces. Just one more thing - especially beginners often don’t know which fingers to use when playing a note. In the next section, we’ll learn about a notation for finger usage: fingering.
Fingering

In the above image, each note is labeled with a number. The following table represents the mapping of fingers to numbers (for both the left and right hand):
| Finger | Number |
|---|---|
| Thumb | 1 |
| Index finger | 2 |
| Middle finger | 3 |
| Ring finger | 4 |
| Little finger (Pinkie) | 5 |
If a piece of music does not have fingering marked, then we recommend that you search for it online or ask your teacher, and then add the fingering yourself (e.g. write it in pencil on the sheet music or when you use a tool like Pianotracker, you can edit the fingering directly in the app).
Easy pieces for the first steps in learning the piano
If you’ve made it this far, you can already read and start playing simple pieces. However, it should be noted here that there are still some notations missing. If you encounter unfamiliar notation, such as small crosses or “b” before the noteheads, or small dots after the noteheads, please continue reading.
For a few simple pieces, please follow the link and start with the five-tone pieces, which are particularly suitable for beginners: Simple pieces of music. Easy music pieces
Dynamics
Even in easy pieces, we need a way to describe the volume of individual passages. It is the use of such transitions from loud to soft and vice versa that make us sit up and give the melody emotional depth.
In the following table, we present the most common volume symbols in order, with the most common ones highlighted in bold (these are the ones you should remember):
| Symbol | Name | Description |
|---|---|---|
| ppp | pianopianissimo | extremely soft |
| pp | pianissimo | very soft |
| p | piano | soft |
| mp | mezo piano | half soft |
| mf | mezo forte | half loud |
| f | forte | loud |
| ff | fortissimo | very loud |
| fff | fortefortizzimo | extremely loud |
| sfz | sforzando | accentuated loud note |
| > | crescendo | getting louder |
| < | decrecendo | getting softer |
While most volume symbols refer to entire sections, crescendos and decrescendos only apply to the notes above or below the symbol (see image below). Furthermore, crescendos and decrescendos remain in the volume class (p or f) in which you are currently playing. This means that if, for example, you are playing in piano (p), and there is a long crescendo, you will gradually get louder and increase to mp, but still softer than a forte (f)! Similarly, a decrescendo within a forte means that while you are getting softer, you are still louder than a piano (so you go from f softer to mf).

Accidentals
As we’ve mentioned before, in C major, we typically only play the white keys. However, there are more complex pieces where we may need to play black keys, especially if they’re meant to evoke a specific mood.
For this purpose, we have what are called key signatures - a # before a note raises it by what’s called a semitone - meaning we simply play the next right key, which could be a black key (or not), if the note we want to play is a C, D, F, G, or A. These raised notes are then pronounced as C-sharp, D-sharp, F-sharp, G-sharp, or A sharp (so you add “-sharp” to the note name). They are written like C#, D#, F#, G#, A#.
However, there are two white keys that don’t have black keys to their right: E and B - if they’re raised by a #, we play the next white key instead, so E becomes F and B becomes C, not E-sharp or B-sharp…
The same principle applies in the opposite direction if we want to lower a note by a semitone. Then, we use a b instead of a #. To speak out loud such note, we add “-flat” to the note name: D-flat, E-flat, G-flat, A-flat, B-flat. To write those notes: Db, Eb, Gb, Ab and Bb (note names are capital letters while the b is lower case). And again, keys without black keys to their left: C and F, which become B and E, not C-flat or F-flat.
An accidental only applies to the notes of a certain pitch - for example if the accidental is in front of a A4, it only applies to all A4s following within that measure, it does not affect an A3 or A5!
To summarize: a # raises the note by a semitone, and a b lowers the note by a semitone. When using a #, you pronounce the note by adding a “-sharp” to its name if the next key is a black key, and when using a b, you add “-flat” (with the exception of A flat and E flat) if the next key is a black key.

In the above image, we have a C#, F, A#, and Bb (C-sharp, F, A-sharp, B-flat).
A sharp or flat sign before a note applies only until the end of the measure!

Here we play: C4 D4 E4 C#4 D E4 C#4 D E4 | C4 D4 E4 - The C# applies only for the first measure!
There’s also a natural sign, which cancels the previous accidental for a particular note and applies only until the end of the measure:

Here we play: C4 D4 E4 C#4 D4 E4 C4 D4 E4 | C4 D4 E
Just to be clear, a natural sign only applies to a particular note pitch. That means that if a natural sign is in front of an A4, it does not affect other A pitches like A3 or A5. It does not apply to any other note like B or G - only to A4 and it applies only until the end of the measure.
Dotted Notes and Ties
As we’ve learned, the duration of a note is determined by its note value. So far, we’ve encountered the whole note as having the highest note value - a whole note is as long as two half notes, four fourth notes, eight eighth notes, 16 sixteenth notes, or 32 thirty-second notes, and so forth.
For example, let’s consider a 6/8 time signature, and we play six eighth notes in the right hand.

What if the composer wants us to play a C in the left hand for each group of three eighth notes? What should be the note value of this C in the left hand? It can’t be fourth notes, as shown in the image above, because then it would only sound for two out of the three eighth notes - we’d have to add an eighth rest. It also can’t be half notes, as those would sound even longer than the three eighth notes together. So, with the existing note values, we can’t achieve the desired effect.
By adding a dot to a fourth note, we can extend its duration by the value of an eighth note. Yes, you read that sentence correctly. A dotted fourth note is played for as long as three eighth notes.

If we want to be mathematically precise, we’re increasing the note value by half - in the example of a fourth note, half of it is an eighth note, and when we add these two note values together, we get 1/4 + 1/8 = 2/8 + 1/8 = 3/8 (note that we replaced the fourth note 1/4 with two eighth notes 2/8, allowing us to add the two note values together).
The following table presents the most common dotted notes and their note values. If you’re not fond of mathematical calculation, you can simply remember the middle column: the note value of a dotted note is simply three times the next smaller note value.
| Note | Note Value | Calculation |
|---|---|---|
 | whole note + half note = three half notes | 1 + 1/2 = 2/2 + 1/2 = 3/2 |
 | half note + fourth note = three fourth notes | 1/2 + 1/4 = 2/4 + 1/4 = 3/4 |
 | fourth note + eighth note = three eighth notes | 1/4 + 1/8 = 2/8 + 1/8 = 3/8 |
 | eighth note + sixteenth note = three sixteenth notes | 1/8 + 1/16 = 2/16 + 1/16 = 3/16 |
There are also corresponding dotted rests, which follow the same note value calculation. For example, a dotted fourth rest has the note value of three eighth rests.
With dotted notes, we can extend the existing note values. However, this method doesn’t allow us to express any arbitrary length of the note - what if we want to play a note for the duration of a half note plus an eighth note? Here’s where another notation comes into play: the tie.

The tie indicates that you should simply extend the note value of the first note by the value of the next note (so you just let the key stay pressed). With ties, we can now create notes of any length. One could also represent dotted notes by connecting two notes with a tie, but the dot is simply shorter and easier/quicker to recognize.
You can recognize a tie by seeing it connecting two identical notes. So, for example, if you see a tie between two different notes, such as a C4 connected to a D4, then it’s not a tie, but rather a slur, which we’ll discuss in the next section. The same applies to C4 and C5 - although both are C’s, they are not the same C’s!
Expression: Slurs, Articulations, and Dynamics
The slur is quite commonly encountered, as it is a very important articulation notation. Here, it’s about expression! It simply groups notes that should be played together. As a reminder, a slur should not be confused with a tie - a tie connects two identical notes, whereas a slur groups multiple (different) notes.

In the image above, we have three such groups of notes in the staff with the treble clef, which should be played together. What does it mean to play them together? Well, these notes should be played smoothly, one after the other, without a pause between them. This is called legato. However, at the end of such a group, you should play a slight audible pause - so in the image above, between the groups, there should be a light audible pause.
Did we mention that this is a type of articulation? Yes - and there are more of them, giving us hints for expression.
| Symbol | Name | Description |
|---|---|---|
 | legato | smooth, connected, flowing (remember: this is not a tied note because of its different note value) |
 | staccato | short, detached, individual |
 | marcato | louder and more forcefully than the surrounding notes |
 | tenuto | the notes should be played for their full duration - slightly emphasized |
 | fermate | here, we should pause briefly - take a short pause (1-3 counting units) and then continue playing... |
Other Key Signatures
C major is the simplest key signature, but not the only one. There are other key signatures that sound slightly different, perhaps a bit sadder. You can recognize other key signatures by the use of one or more accidentals (# or b), which are displayed on the staff between the clef and the time signature.
We’ll delve deeper into other key signatures in another article. For now, for reading music, you only need to know that the accidentals of the key signature apply to all notes on the respective line.

For example, in the image above: G major has a # on the line of F - regardless of which clef is used - both staves always have the same accidentals for the same notes (F in the case of G major). It cannot be that the first staff has a # on the line of F and the second staff has a # on the line of G! Nor can it be that the first staff has one # and the second staff has two # - both staves always represent the same key signature, as it refers to the piece of music and not to the staff. And there’s only one key signature with just one # - that’s G major, and consequently, the single # will always be on F and not on any other note!
The following table lists the most common key signatures:
| Symbol | Name | Scale Notes |
|---|---|---|
 | C major | C D E F G A B C |
| G major | G A B C D E Fis G |
 | D major | D E Fis G A B Cis D |
 | A major | A B Cis D E Fis Gis A |
 | E major | E Fis Gis A B Cis Dis |
 | F major | F G A Bes C D E F |
 | Bes major | Bes C D Es F G A Bes |
 | Es major | Es F G As Bes C D Es |
 | As major | As Bes C Des Es F G As |
As we can see, with # key signatures, there’s always one #, and with b key signatures, there’s always one b - it’s either all # or all b, never both symbols appear…
Unlike accidentals in front of a note, the accidentals for the key signature apply to all notes, regardless of their pitch/octave. That means, for example, in the case of G major, F# applies to all F’s - regardless of the octave - such as F#0, F#1, F#2, F#3, F#4, F#5, and so on… Of course, a natural sign in front of a note can cancel any key signature accidental until the next measure…
Es können trotzdem noch individuelle Verzeichen angegeben werden:

In the first measure, we have two C#4 followed by two C5. In the second measure, we have a C4 followed by a F#4. In the third measure, we have F#4 F4 F4 F#4.
The theory of key signatures is actually much more complex, and we’ll describe it in more detail in another article. For reading music, however, you should now be familiar with almost all common notations 🙂
Further links
If you encounter an unknown symbol or you can not remember what it meant, then we can recommend to use the following Wikipedia page to quickly lookup: Wikipedia: List of musical symbols